
Overview
Getting Started
Theme Features
Theme Guide
Welcome to the Theme Guide! This documentation covers everything you need to know about installing, setting up, and customizing a Full Site Editing (FSE) WordPress theme.
Throughout this guide, we’ll walk you through the complete process—from theme installation and activation to customizing templates, template parts, patterns, and global styles using the WordPress Site Editor.
Introduction
A WordPress theme controls the overall design, layout, and appearance of your website. It defines how your content is presented, including the color scheme, typography, page layouts, spacing, and other visual elements that create a consistent look and feel across your site.
With a Full Site Editing (FSE) theme, you can customize nearly every part of your website using the WordPress Site Editor and blocks—without writing code. This gives you complete control over your site’s design while making it easy to create and update pages, templates, and reusable layouts.
Getting Started
Before getting started, make sure your website is running WordPress 5.9 or later, as Full Site Editing (FSE) is supported from this version onward. For the best experience, we recommend using the latest stable version of WordPress to ensure compatibility, improved performance, and access to the newest features.
Installing Theme in WordPress
- WordPress Repository
- Uploading Zip
Install a Theme from the WordPress Theme Directory
To install a theme directly from the official WordPress Theme Directory.
Navigate to Dashboard → Appearance → Themes.
On the Themes page, you’ll see all the themes currently installed on your website. To browse and install additional themes, click Add New Theme.
You’ll be taken to the WordPress Theme Directory, where you can browse featured themes or use the search bar to find a specific one. Once you’ve found the theme you want to install, hover over it and click Install.
After the installation is complete, click Activate to make the theme live on your website.
Install a Theme Using a ZIP File
Installing a theme using a ZIP file is useful when you have downloaded the theme manually or received it from a developer.
This method is commonly used for themes that are not available in the WordPress Theme Directory, such as premium themes, custom-built themes, or themes provided directly by a developer or organization.
To install a theme using a ZIP file:
Navigate to Dashboard → Appearance → Themes, then click Add New Theme followed by Upload Theme.
Click Choose File and select the theme’s .zip file from your computer. Once selected, click Install Now to begin the installation.
After the installation is complete, click Activate to make the theme live on your website.
Theme Features
Templates
Templates define the layout and structure of different types of content on your website. Each template is automatically applied based on the page or content being viewed, ensuring a consistent design across your site.
- Homepage
- Page
- Post
- WooCommerce
Front Page
The layout used for your website’s homepage when a static page is set as the front page.
Blog
The template used for your blog posts page, displaying a list of recent articles.
Index
The fallback template used when no more specific template matches the current page or content.
Page
The default template for standard WordPress pages, featuring a right sidebar.
Page (Left Sidebar)
Displays standard pages with the sidebar positioned on the left.
Page (Full Width)
Displays pages without a sidebar, allowing the content to span the full width of the page.
Blank
A minimal template without a header or footer, ideal for creating custom landing pages or canvas layouts.
Blank with Header and Footer
A simplified template that includes the site’s header and footer while leaving the main content area free of additional layout elements.
Page Sitemap
Displays a sitemap page, providing visitors with an organized list of your website’s pages to help them navigate your content.
Single
The default template for individual blog posts, featuring a right sidebar.
Single(Left Sidebar)
Displays individual blog posts with the sidebar positioned on the left.
Single(Full Width)
Displays individual blog posts without a sidebar, providing a wider reading area.
Archive
Displays lists of posts for categories, tags, authors, or date archives.
Search
Displays search results based on a visitor’s search query.
404
Displayed when a visitor attempts to access a page that cannot be found.
Archive Product
Displays a collection of WooCommerce products, such as the main shop page or product category archives.
Single Product
The default template for individual WooCommerce product pages.
Single Product (Full Width)
Displays individual product pages with the sidebar positioned on the left.
Single Product(Left Sidebar)
Displays individual product pages without a sidebar, providing more space for product content.
Cart
The template used for the WooCommerce shopping cart page.
Checkout
The template used for the WooCommerce checkout process.
Customizing Theme Templates
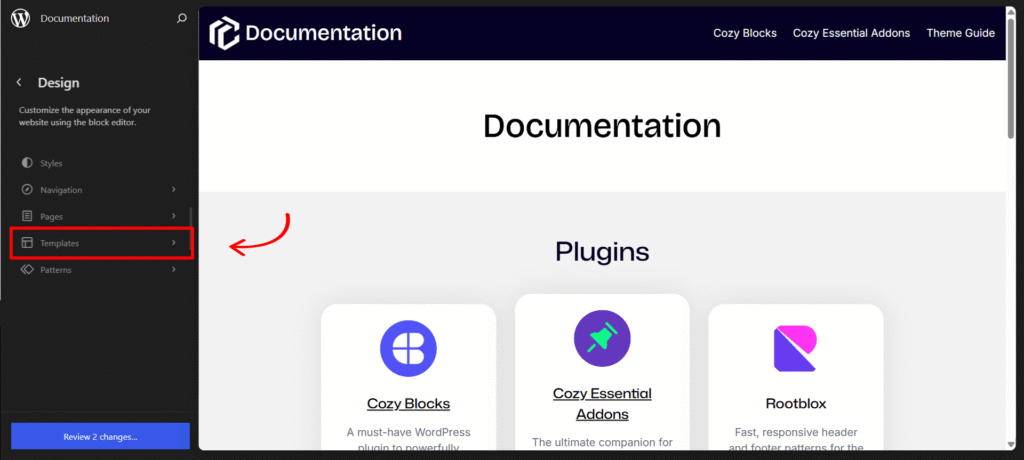
These are the template variations available in most of our themes. You can customize them to change the layout and appearance of different parts of your website.
To access the templates, navigate to Dashboard → Appearance → Editor.
Once you’re in the Site Editor, select Templates from the left sidebar. Here, you’ll find all the templates available on your website. Templates provided by your active theme are grouped under the theme’s name, making them easy to identify.
Creating Template
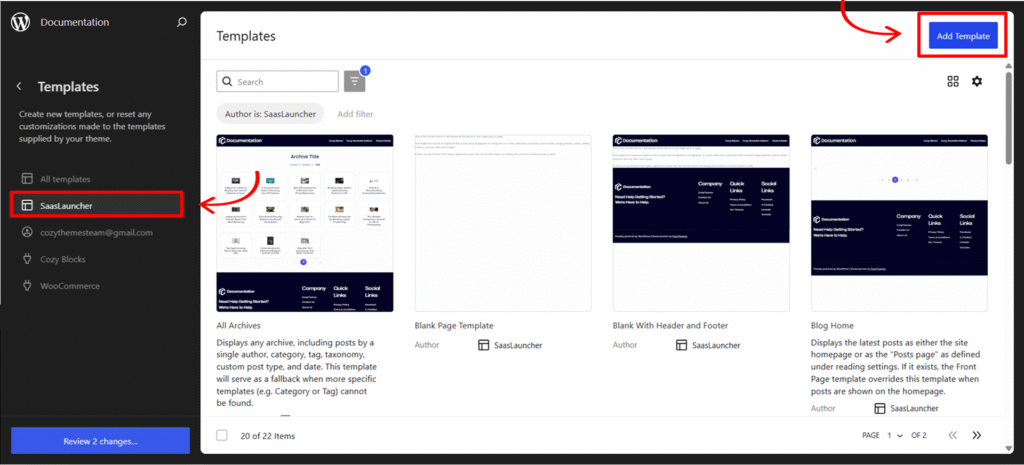
To create a new template, click Add Template in the top-right corner and choose the type of template you want to create.
Reset Template
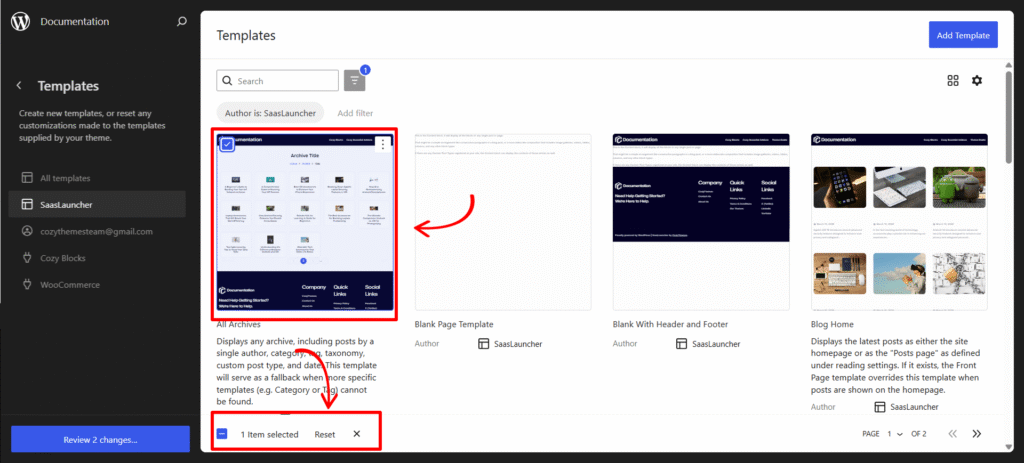
If you’ve made changes to a template and want to restore its original design, you can reset it to the default version provided by the theme.
To do this, navigate to Dashboard → Appearance → Editor → Templates. Select the template(s) you want to reset by checking the corresponding checkbox, then click Reset at the bottom of the page.
Note: Resetting a template permanently removes all customizations made to that template. This action is irreversible and cannot be undone.
Patterns
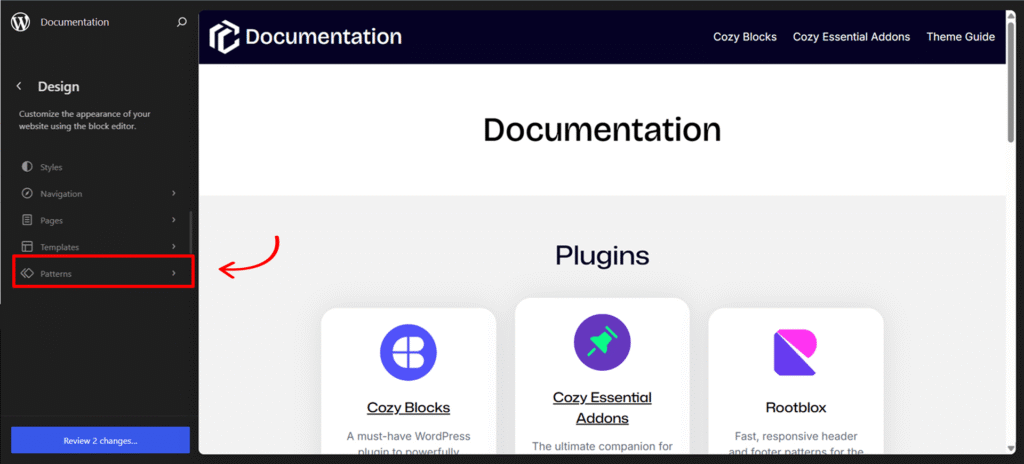
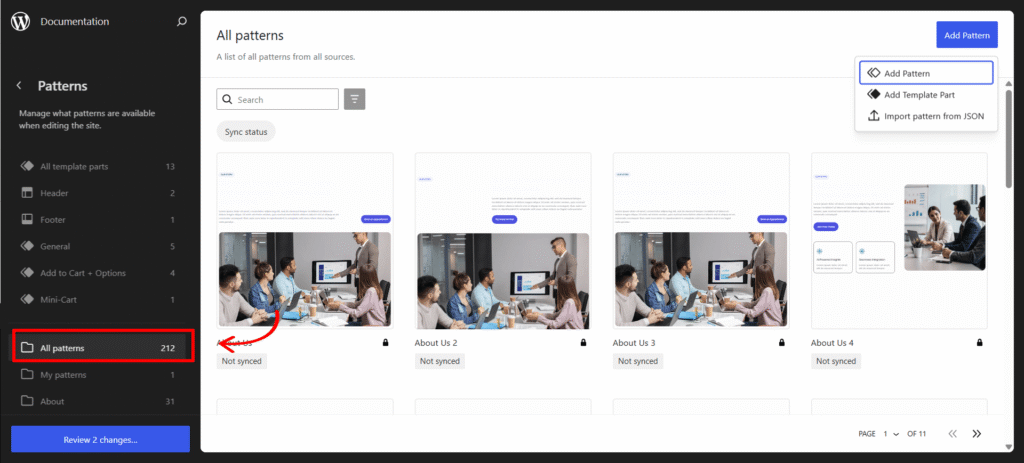
Pattern are reusable block layouts that can be inserted into pages, posts, templates, or template parts. They are ideal for creating commonly used sections such as hero banners, testimonials, call-to-action sections, FAQs, galleries, and more.
To create a new pattern, click Add Pattern in the top-right corner, choose whether you’d like to create a Synced Pattern or a Standard Pattern, and start building your layout using blocks.
Template Parts
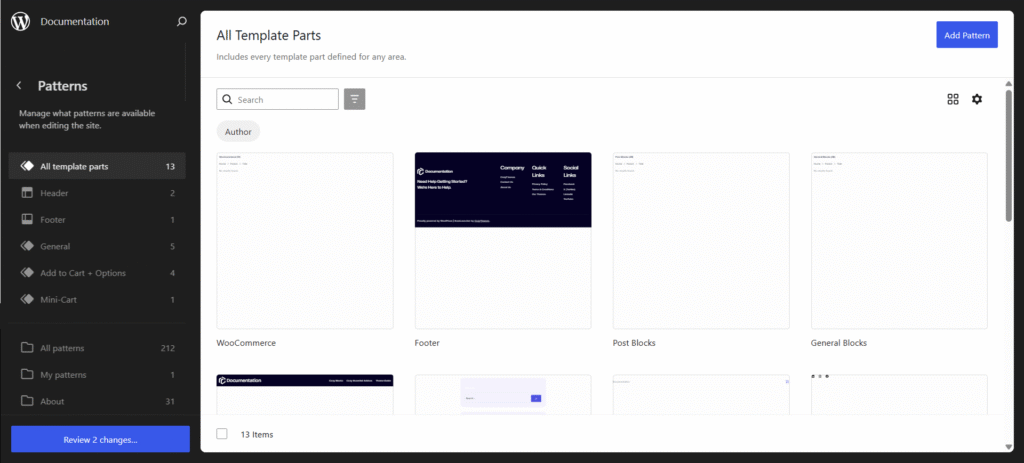
Template Parts are reusable sections that are shared across multiple templates. They help maintain consistency throughout your website by allowing you to edit a section once and have those changes reflected everywhere it’s used.
To access patterns, navigate to Dashboard → Appearance → Editor. Once you’re in the Site Editor, select Template Parts from the left sidebar.
To create a new template part, navigate to Patterns, click Add Pattern, and select Create Template Part. Give your template part a name, choose its type (such as Header, Footer, or General), and begin designing it using the block editor.
Any changes made to a template part are automatically applied to every template that uses it, making it easy to maintain a consistent design across your website.
Global Styles
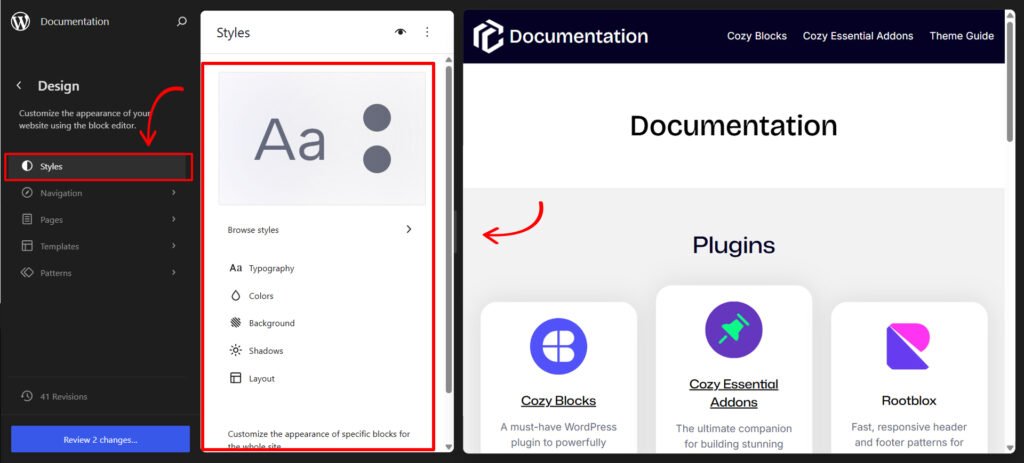
Global Styles allow you to customize the overall appearance of your website from a single location. They include the theme’s preset colors, typography, spacing, layout settings, and other design options. Changes made in Global Styles are applied site-wide, ensuring a consistent look and feel across all templates, pages, posts, and blocks.
To access Global Styles, navigate to Dashboard → Appearance → Editor. Once you’re in the Site Editor, select Styles from the left sidebar.
Within the Styles panel, you’ll find several customization options:
Typography
The Typography section lets you customize the fonts and text styles used throughout your website. Changes made here are applied globally, ensuring a consistent typographic style across all templates and pages.
Within the Typography settings, you can:
- Choose a Typeset – Select from the predefined font combinations included with your theme.A Typeset is a predefined combination of fonts selected to work well together. Typically, it includes one font for headings and another for body text, creating a balanced and visually appealing typography system.
- Manage Fonts – Download fonts from Google Fonts, then install and manage additional fonts available in WordPress.
- Customize Elements – Adjust the typography for individual elements, including Text, Headings, Links, Captions, and Buttons.
- Font Size Presets – Modify the predefined font size presets used throughout your site or create custom font size presets to maintain consistent typography across your content.
Colors
The Colors section lets you manage the color scheme used throughout your website. You can customize the theme’s predefined colors or assign specific colors to different elements to maintain a consistent visual style across your site.
Within the Colors settings, you can:
- Palette – View and edit the current color palette provided by the theme. You can modify existing colors, add custom colors, or choose from the available color palette variations to quickly change the overall color scheme of your website.
- Elements – Set colors for specific website elements, including Text, Background, Links, Captions, Buttons, and Headings. Changes made here are applied globally to the corresponding elements throughout your website.
Using the global color settings helps maintain a consistent color scheme and makes it easier to update your website’s appearance without having to change the colors of individual blocks manually.
Background
The Background section lets you set a site-wide background image for your website. A background image can enhance the overall visual appearance of your site and provide a consistent backdrop across supported templates and pages.
To apply a background image, click Background, upload a new image or choose one from the Media Library, then save your changes.
Shadows
The Shadows section lets you manage the shadow presets available throughout your website. You can use the predefined shadow styles provided by the theme or create custom shadow presets to achieve the desired depth and visual emphasis for your design.
Shadow presets can be applied to supported blocks and elements, helping you maintain a consistent look and feel across your website.
Layout
The Layout section lets you configure the default layout settings for your website. These settings control the overall dimensions and spacing used across templates and blocks, helping you maintain a consistent structure throughout your site.
Within the Layout settings, you can customize:
- Content Width – Sets the default maximum width for your website’s content area.
- Wide Width – Defines the width used by blocks aligned as Wide.
- Padding – Controls the default inner spacing around content.
- Block Spacing – Sets the default spacing between blocks, ensuring a consistent layout across your website.
Changes made in the Layout settings are applied globally wherever these presets are used.
Block Styles Variations
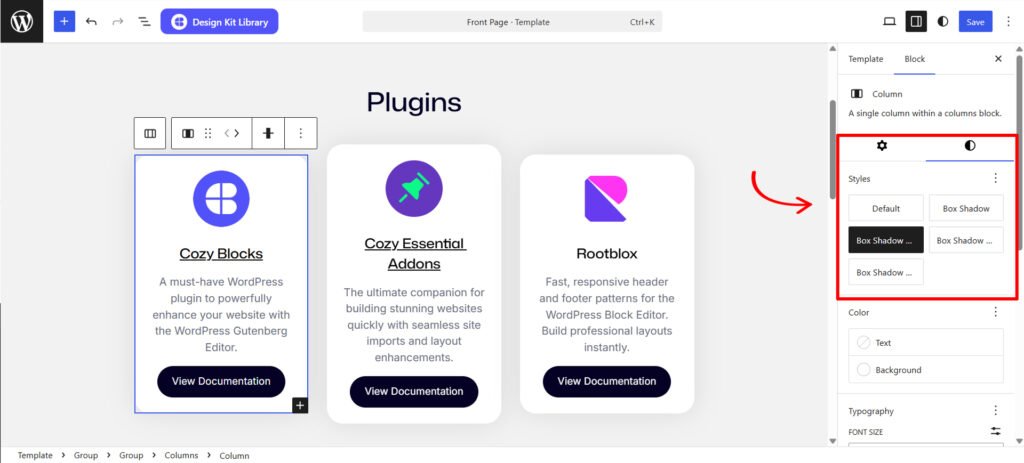
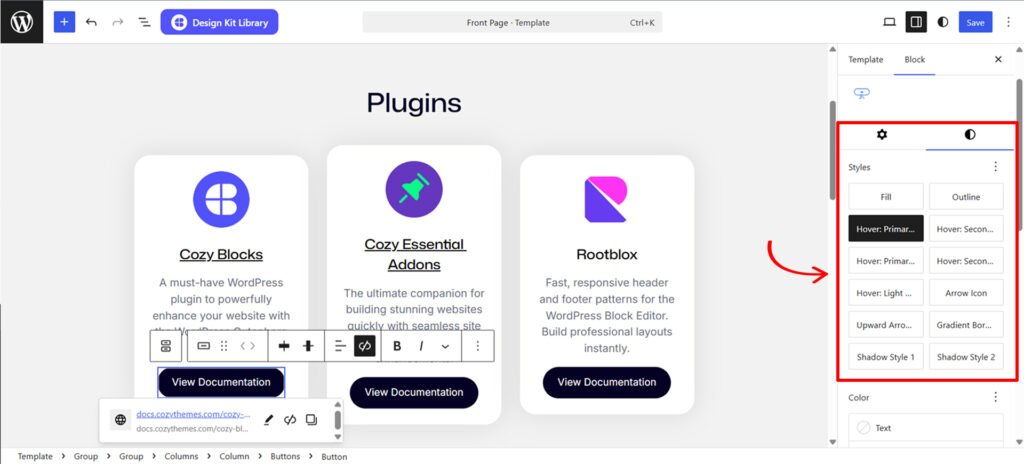
Block Styles Variation are additional predefined styling options for individual WordPress blocks. They allow you to quickly change the appearance of a block without modifying its content or manually adjusting its design settings.
To apply a Block Style, select a block in the WordPress Block Editor or Site Editor, then open the Styles tab in the block settings sidebar and choose one of the available style variations.
The available Block Styles vary from theme to theme. Each theme includes its own curated collection of styles designed to complement its overall design, making it easy to create visually consistent layouts with just a few clicks.